Integrations
Drag & drop
Section titled “Drag & drop”Drop files onto Picmal in three ways:
- App window — Drop files directly into the main window
- Dock icon — Drop files onto the Picmal icon in your Dock
- Menu bar icon — Drop files onto the menu bar icon (when menu bar mode is enabled)
You can drop individual files or entire folders.
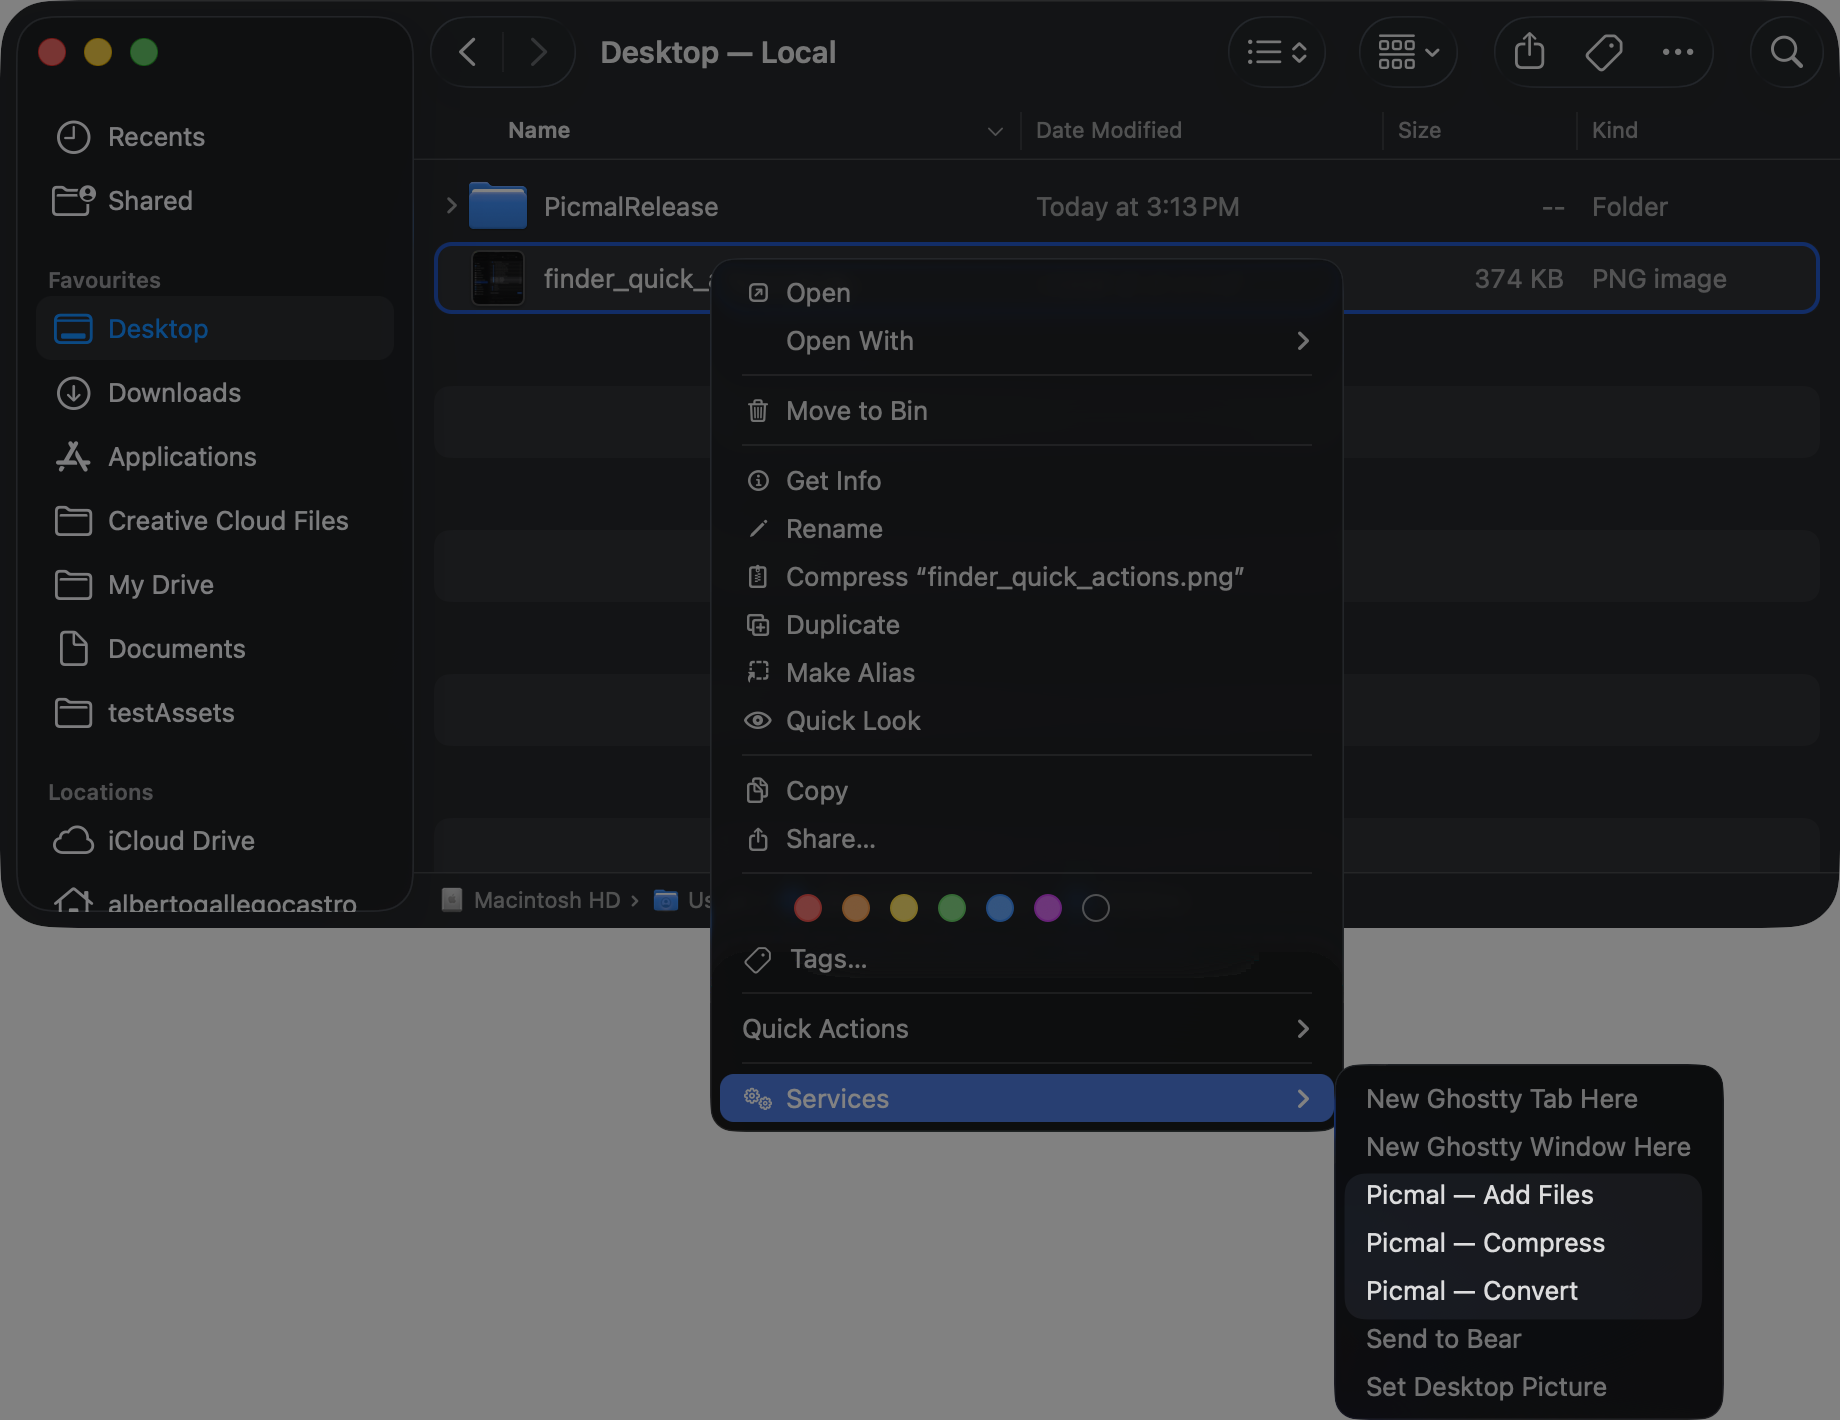
Finder services (right-click menu)
Section titled “Finder services (right-click menu)”Picmal adds five services to Finder’s right-click menu:
- Picmal — Compress — Compresses the selected files right away
- Picmal — Convert — Converts the selected files right away
- Picmal — Add Files — Adds the selected files to the Picmal window without processing them, so you can tweak settings first
- Picmal — Combine PDFs — Merges the selected PDFs into one, in selection order. Only appears when every selected file is a PDF
- Picmal — Images to PDF — Turns the selected images into a multi-page PDF. Only appears when every selected file is an image
To enable these services:
- Open System Settings (or System Preferences)
- Go to Keyboard → Keyboard Shortcuts → Services
- Scroll to the Files and Folders section
- Check the Picmal entries you want
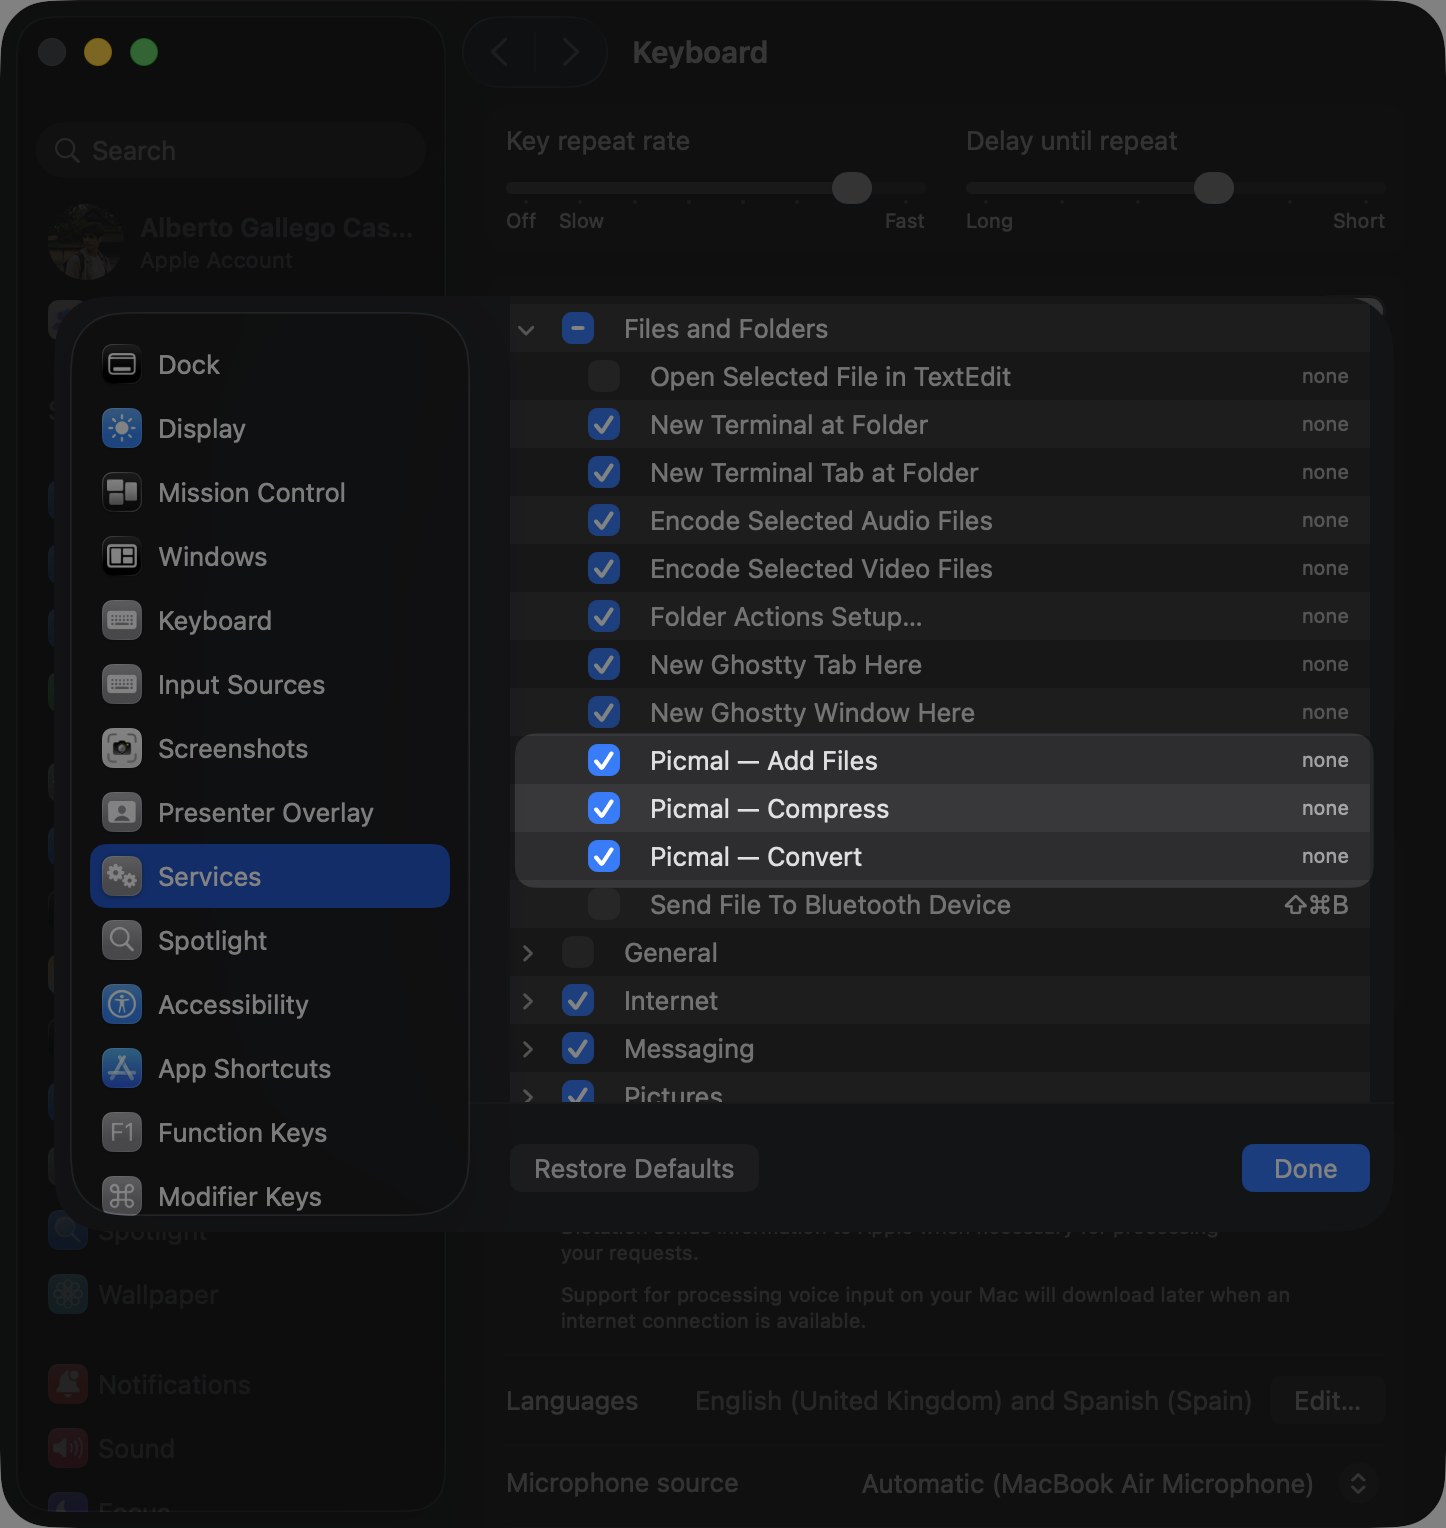
Once enabled, select files in Finder, right-click, and find them under Services (or Quick Actions).
Services use your current settings
Section titled “Services use your current settings”Compress and Convert from Finder use whatever you’ve already set up in the app. There’s no separate dialog. Your quality preset, output format, resize and color-space options, metadata handling, the file-naming pattern, and where files get saved all apply.
So set things up the way you want them in Picmal before you lean on the services:
- Where files go. By default, outputs sit next to the originals. To send them to a subfolder instead, turn on Settings → Output → Save outputs in a subfolder and give it a name. The services respect this the same way the app does; with it off, files land beside the source. See Output and naming.
- File names, the quality preset, and the output format come from your current settings too, so adjust them under Settings first.
- Combine PDFs merges in Finder’s selection order and saves
<first name> (combined).pdfnext to the originals. Images to PDF uses your saved page size and quality from the PDF tools options (passwords never apply to service runs) and saves<first name>.pdf. Want to reorder pages first? Open the tool in the app instead.
Want to check or change settings for a specific batch first? Use Picmal — Add Files instead. It drops the files into the window so you can pick your options and hit Compress or Convert yourself.
Running with the app closed
Section titled “Running with the app closed”You don’t need Picmal open. Picmal — Compress, Picmal — Convert, Picmal — Combine PDFs, and Picmal — Images to PDF run in the background without opening the window, post a notification when they’re done, and quit on their own. If the app is already open, they run there and it stays open. Picmal — Add Files always opens the window so you can see what’s queued.
Shortcuts app
Section titled “Shortcuts app”Picmal provides four actions for Apple’s Shortcuts app, so you can build automated workflows.
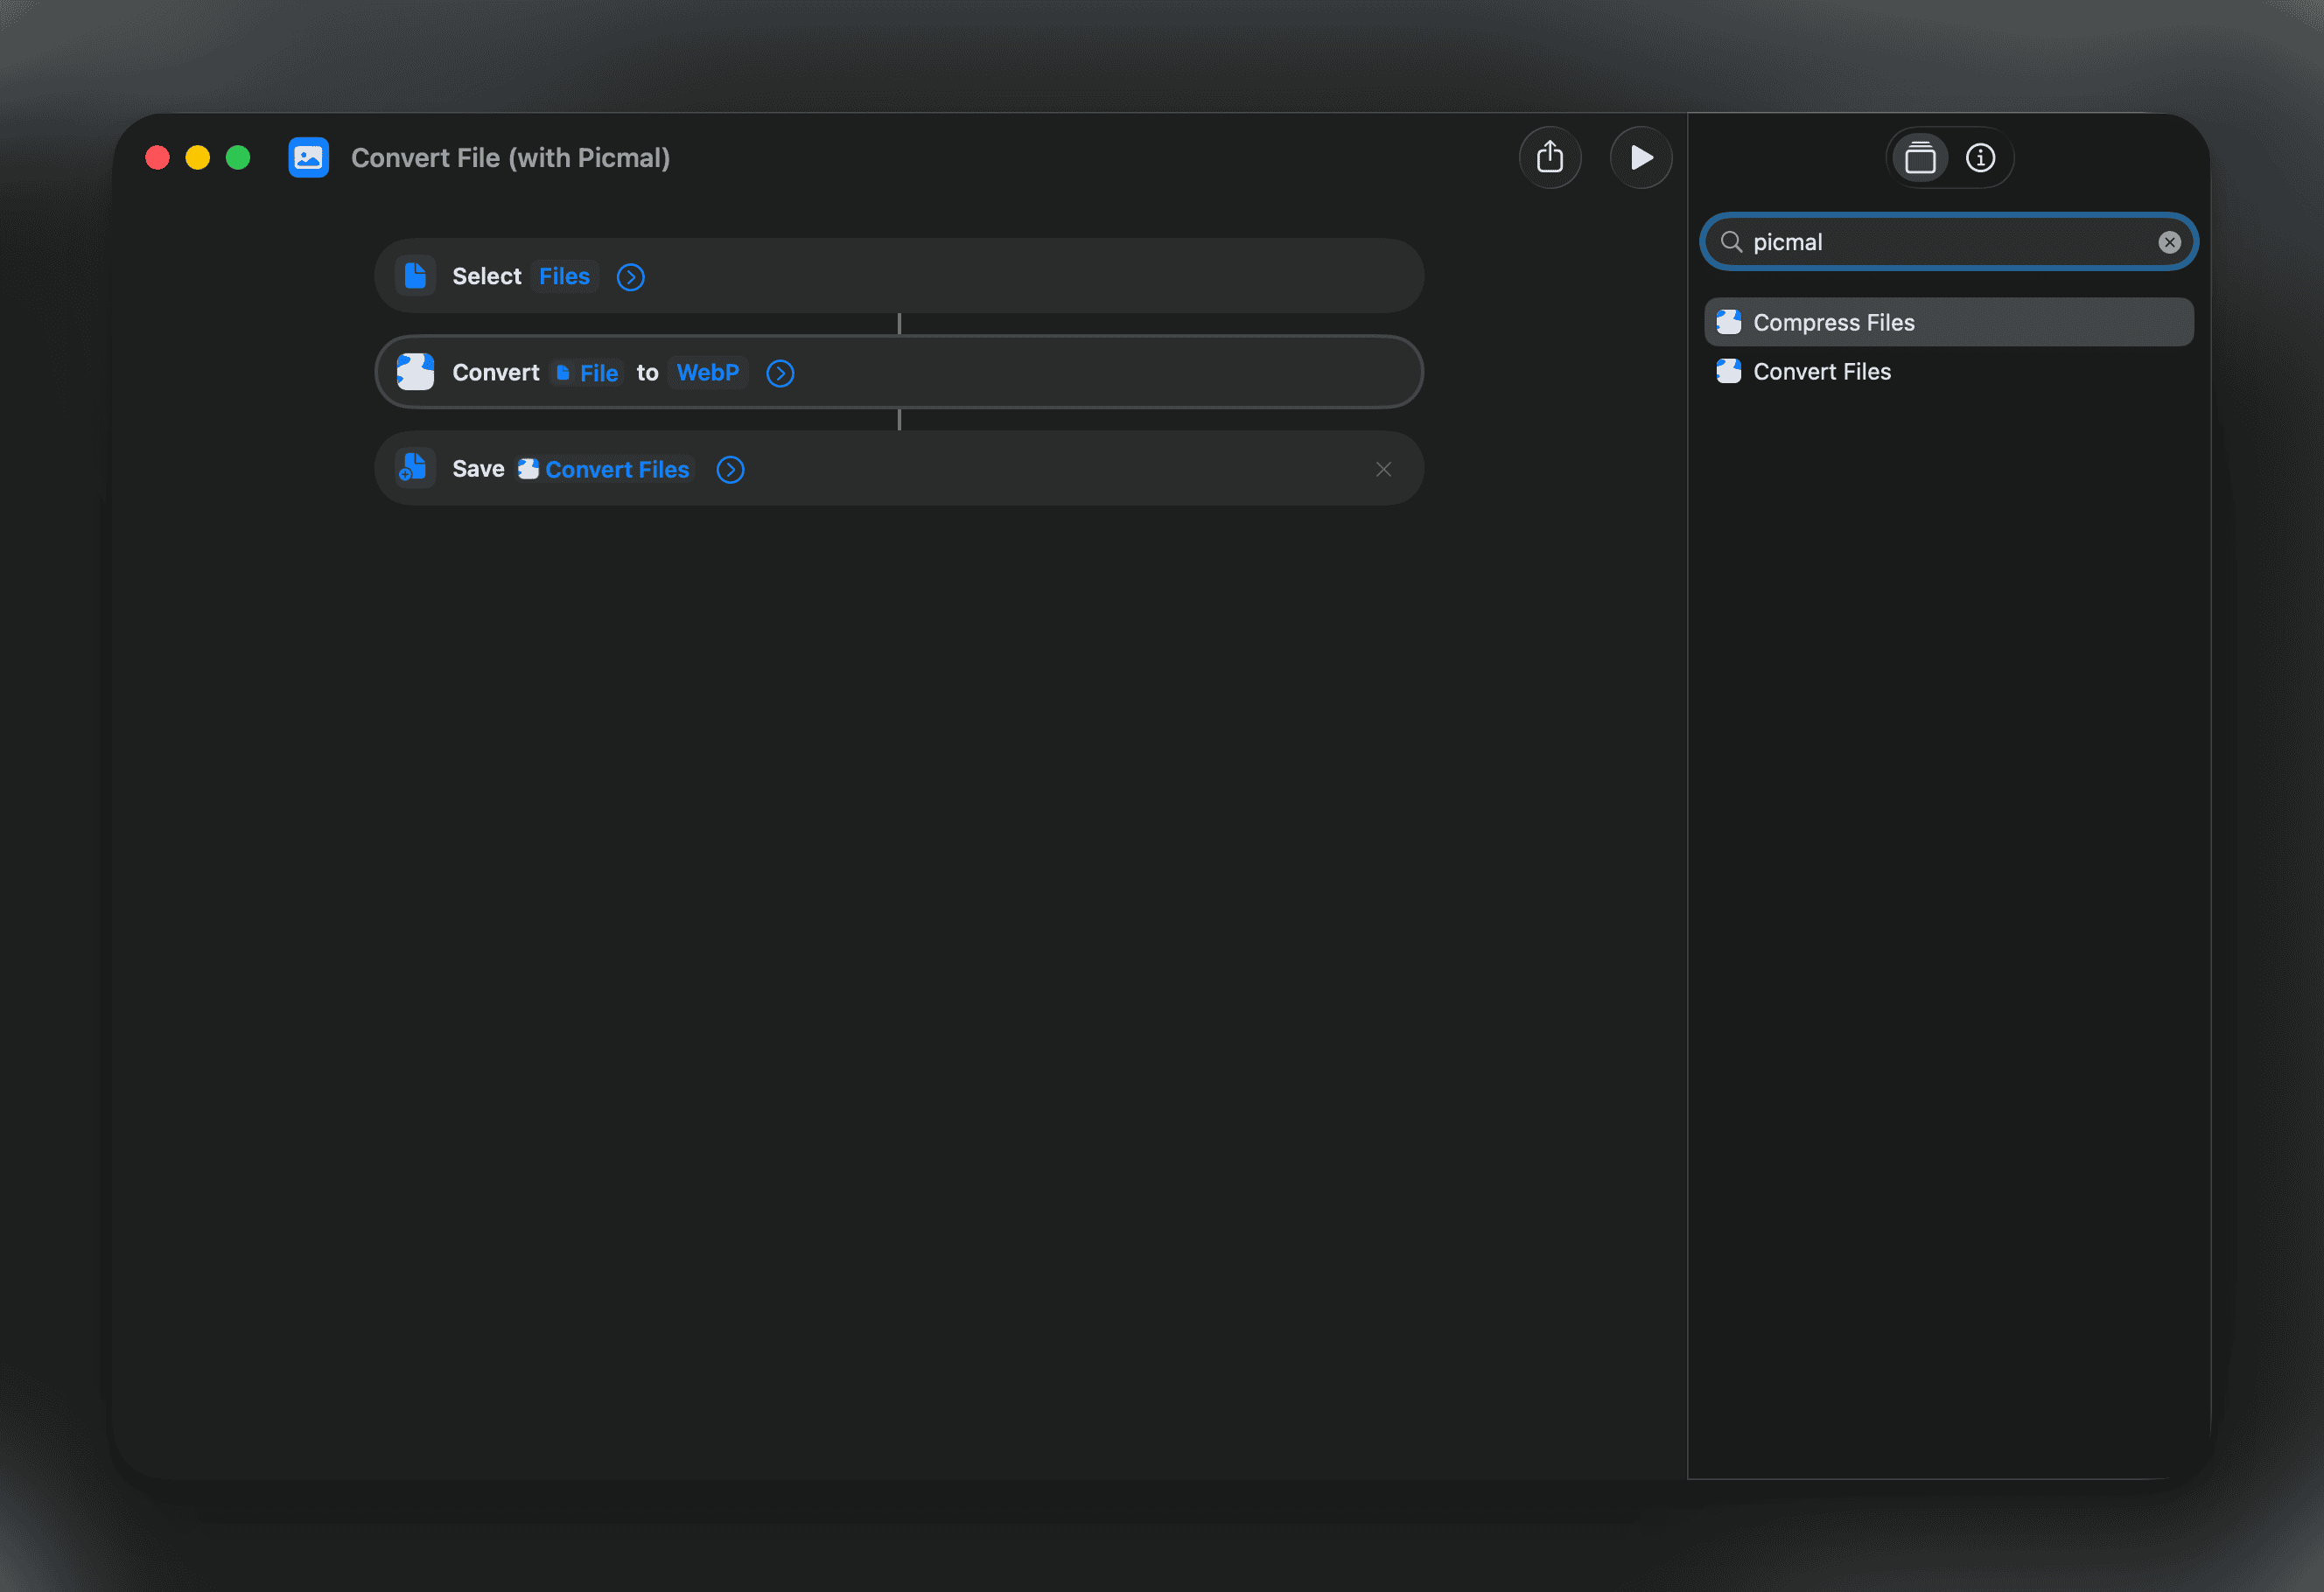
Convert files
Section titled “Convert files”| Parameter | Description |
|---|---|
| Files | The files to convert |
| Output format | Target format |
| Preset | Compression preset to apply |
Compress files
Section titled “Compress files”| Parameter | Description |
|---|---|
| Files | The files to compress |
| Preset | Compression preset |
| Custom quality | Quality value (1–100) when using Custom preset |
| Remove metadata | Strip metadata from output |
Combine PDFs
Section titled “Combine PDFs”| Parameter | Description |
|---|---|
| PDFs | The PDFs to merge, in page order (two or more) |
Returns the merged PDF, ready for a “Save File” action or the next step in your shortcut.
Make PDF from Images
Section titled “Make PDF from Images”| Parameter | Description |
|---|---|
| Images | The images to place on pages, in order |
| Page size | Fit to Image, A4, or US Letter |
| Quality | JPEG quality for embedded images (40–100) |
| Password | Optional password required to open the PDF |
Returns the finished PDF.
Use these to build automations like “compress every screenshot I take,” “convert HEIC photos to JPEG when added to a folder,” or “merge this month’s invoices into one PDF.”
Ready-made shortcuts
Section titled “Ready-made shortcuts”Ready-made shortcuts to get you started. Click any link to add it to your Shortcuts app:
- Convert file (with Picmal)
- Compress file (with Picmal)
- Combine PDFs (with Picmal)
- Make PDF from Images (with Picmal)
Menu bar mode
Section titled “Menu bar mode”Enable keep in menu bar in Settings to add a Picmal icon to your menu bar. The app stays running in the background even when the main window is closed.
Click the icon to open the menu, or drop files directly onto it to process them.
Quick actions
Section titled “Quick actions”| Item | Shortcut | Action |
|---|---|---|
| Optimize File… | ⇧⌘O | Pick a file with the system file picker and run it through the clipboard pipeline |
| Optimize Clipboard | — | Toggle clipboard optimization on or off |
| On Copy | — | Choose what happens when you copy: Compress, Convert, or both. Greyed out when monitoring is off |
| Target Format | — | When the action involves conversion, pick the output format. Hidden in Compress-only mode |
| Auto-Copy Result | — | Toggle auto-copy without opening Settings |
| Open Picmal | O | Open the main window |
| Settings… | , | Open Settings |
| Quit Picmal | Q | Quit Picmal |
The clipboard quick controls bind to the same values as Settings → Images, so the menu and Preferences always stay in sync.
Start at login
Section titled “Start at login”Enable start at login in Settings so Picmal launches when you log in. Together with menu bar mode and watched folders, that means processing keeps running after a reboot without you having to open the app.